Virgin Media broadband checker
Virgin Media broadband checker for cable, Nexfibre and Hub issues
Use this Virgin Media broadband checker guide to understand whether cable or Nexfibre may be available at the address, then diagnose Hub 3, Hub 4, Hub 5, 192.168.0.1, modem mode, latency and Wi‑Fi issues.

Check your renewal price
Is your Virgin Media bill rising?
If the renewal price is high or evening performance remains poor, check whether Openreach FTTP, CityFibre or another altnet has reached your postcode.
Virgin Media broadband checker
Virgin Media availability checks are different from Openreach-based ISP checks because the address may be on coaxial/HFC, RFoG or Nexfibre. Check availability first, then diagnose the Hub, gateway, modem-mode router and local Wi‑Fi separately.
- Check Virgin Media availability: Confirm whether Virgin Media cable or Nexfibre appears available before comparing speeds or upload profiles.
- Identify the access type: HFC, RFoG and Nexfibre can have different upload, latency and evening-congestion behaviour.
- Test the Hub separately: Open the Hub gateway, run wired tests, then compare modem mode and Wi‑Fi rooms.
Virgin Media cable, Nexfibre and Hub isolation path
Virgin Media checks should start by identifying the access path: legacy coaxial/HFC, newer Nexfibre full fibre, the Hub model, any modem-mode router and the tested device. Open the Hub status page at 192.168.0.1 first, then take a same-room wired result before judging Wi‑Fi.
If Virgin Media feels fast for downloads but laggy during uploads or gaming, run the Bufferbloat Test, then check for drops with the Packet Loss Test and compare idle against loaded behaviour with the Loaded Latency Test.
HFC vs Nexfibre: identify your Virgin Media line type
Virgin Media can be delivered over legacy coaxial/HFC, RFoG or newer Nexfibre XGS-PON full fibre. The access type changes the upload profile, latency behaviour and the way you should read faults.
Diagnosing Virgin Media Hub 3, Hub 4 and Hub 5 bottlenecks
- Hub gateway first: open
192.168.0.1and record downstream, upstream, power and status information before rebooting the Hub or changing Wi‑Fi settings. - Hub 3 latency jitter: older Hub 3/Puma-based hardware can show loaded-latency spikes. Use the Loaded Latency Test and Bufferbloat Test before requesting a Hub review.
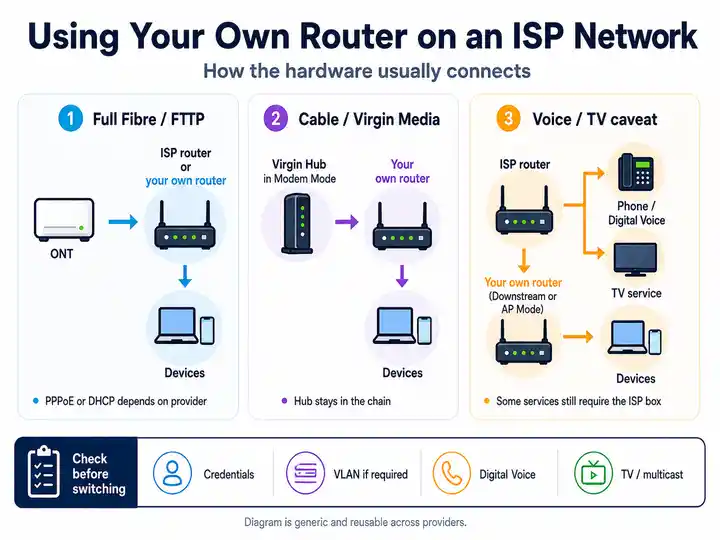
- Modem mode and mesh: Hub 3, Hub 4 and the standard Hub 5 support Virgin Media’s documented modem mode and use
192.168.100.1for Hub status. Virgin Media’s current guidance excludes Hub 5x, so identify the exact model before changing the routing topology. - HFC versus Nexfibre: identify whether the address is on coaxial/HFC or a Nexfibre full-fibre feed before comparing upload speed, latency and evening behaviour.
Virgin Media Hub 3, 4, 5 and 5x status lights
Before changing Wi‑Fi or mesh settings, check the Hub LED pattern. Virgin Media uses different light layouts across Hub 3, Hub 4, Hub 5 and Hub 5x, so treat the table as a diagnostic guide and confirm the exact meaning for your model if the fault persists.
| Hub light status | What it usually means | Most useful action |
|---|---|---|
| Solid red on Hub 3 or Hub 4 | The Hub may be overheating or reporting a hardware fault. | Move it upright into open air, keep vents clear, let it cool, then restart. If red returns, report the Hub model and light state to Virgin Media. |
| Flashing green or flashing white | The Hub is starting up, connecting to the Virgin Media network or applying an update. | Do not pull the power during this state. Wait up to 15 minutes before restarting or changing cables. |
| Flashing amber or scanning arrows | The Hub is scanning for downstream signal or trying to complete registration. | Check the white coax cable, splitter and wall socket on HFC, or the ONT-to-Hub link on full fibre. |
| Flashing red on Hub 5 or Hub 5x | The Hub may have lost the external coaxial, RFoG or optical service path, or it may not be provisioned correctly. | Power-cycle the Hub for 30 seconds, check area status, then quote the flashing red state to support if it returns. |
| Solid blue | WPS pairing or a device-discovery state is active on many Virgin Hub models. | Wait for WPS to time out or finish pairing. If broadband is otherwise online, troubleshoot the device being paired rather than the access line. |
| Steady white base light | The Hub has completed startup and should be online on many current Hub models. | If performance is still poor, move to wired testing, network logs, modem mode and room-by-room Wi‑Fi checks. |
Optimising Virgin Media Hub gateway and modem-mode performance
- Gateway status at
192.168.0.1: capture Hub status before changing channels, split SSIDs or power cycling. This gives better evidence than a screenshot of one slow Wi‑Fi result. - Hub 3 versus Hub 5: repeated latency spikes on a Hub 3 should be tested with wired loaded-latency results. A Hub 5 or stronger third-party router can change Wi‑Fi and queueing behaviour.
- Modem mode at
192.168.100.1: on Hub 3, Hub 4 or the standard Hub 5, enable modem mode before placing Eero, TP-Link Deco, UniFi or another router in charge of NAT and Wi-Fi. Confirm the model first because the Hub 5x follows different full-fibre firmware and support rules. - HFC, RFoG or Nexfibre: legacy coaxial/HFC and newer full-fibre areas do not always have the same upload profile. Judge upload and latency against the access technology at the property.
- Wired first, then room tests: run Ethernet near the Hub to confirm the line, then retest over Wi‑Fi in the rooms that matter so mesh placement is not confused with a Virgin network fault.
Read 192.168.0.1 network logs for T3 and T4 timeouts
Speed tests only measure the line while it is up. If Virgin Media drops repeatedly, log into http://192.168.0.1, or http://192.168.100.1 in modem mode, and check the Hub status and Network Logs before rebooting again.
- No Ranging Response received - T3 Ranging Time-out: the Hub tried to talk upstream to the network but did not get the expected response. A rare entry is not decisive, but repeated daily entries alongside dropouts point to upstream noise, signal imbalance or a cabinet/tap issue.
- T4 Time-out or maintenance-opportunity errors: the Hub has lost communication for long enough to reset its cable interface and rebuild the connection. This is stronger evidence of a line or network path problem than a simple weak Wi‑Fi room result.
- What to send support: screenshot the timestamped T3/T4 entries, the Hub model, the light colour and whether the issue happens in router mode or modem mode. This makes it harder for support to dismiss the fault as local Wi‑Fi range.
- Separate a line drop from Essential Security or Web Safe: T3/T4 entries, Hub-light changes or loss across several devices point towards the access path. If the Hub stays online, the signal and log evidence remain stable, and only one site, VPN, game or content category fails, check Essential Security (formerly Web Safe) and parental-control settings in My Virgin Media before reporting an RF fault.
Virgin Media Stream Box loading and verification loops
Virgin Stream is IP-delivered, so a Stream Box stuck on verification, connection checking or a repeated loading loop can look like broadband buffering even when the wider line is usable.
Refresh the app and account handshake
Restart the Stream Box and Hub, then sign back into the Virgin Media account flow if prompted. If the box works after the restart but fails again later, compare loaded latency while another device is downloading.
Manual recovery flush
Use this only after a normal reboot fails: unplug the Stream Box power, hold the physical standby button on the box, reconnect power while holding the button, then keep holding for roughly 15 seconds until the LED changes or flashes. Let the device finish recovery before testing again.
Virgin Media Hub and evening slowdown evidence checklist
Collect evidence that separates local segment load, Hub queueing, modem-mode routing and Wi‑Fi distribution before switching or raising a fault.
- Record the Hub model, Hub light colour and whether the address uses coaxial/HFC, RFoG or Nexfibre full fibre.
- Open
192.168.0.1in router mode or192.168.100.1in modem mode and note the status plus any repeated T3/T4 network-log entries before rebooting. - Run wired speed and loaded-latency tests in the daytime and during the busy evening period.
- Run the Bufferbloat Test while another device uploads or streams, then confirm drops with the Packet Loss Test.
- If only Wi‑Fi rooms are poor, record same-room and problem-room results separately before blaming the Virgin access line.
Virgin Media fault pattern table
| Virgin Media symptom | Most useful next check | Likely fault layer |
|---|---|---|
| Hub 3 shows high ping while downloads look fast | Run the Loaded Latency Test and repeat with a wired device close to the Hub. | Hub queueing, chipset latency or household load |
| High download but gaming lag | Run the Bufferbloat Test while another device uploads. | Hub queueing or upload saturation |
| Evening-only wired slowdown | Repeat wired tests at different times and compare peak against off-peak. | Local segment capacity or provider-side congestion |
| Third-party mesh network unstable | Check modem mode, visit 192.168.100.1 for Hub status and retest with one device wired directly. | Double NAT, mesh backhaul or routing path |
| Pages stall or calls drop | Run a Packet Loss Test during the failure window. | Packet loss, RF/signal stability or local congestion |
| Hub light is red, flashing green/white or blue | Use the Virgin Media Hub light key before changing Wi‑Fi settings. | Hub update, WPS, overheating, provisioning or physical link |
| Repeated T3 or T4 errors in 192.168.0.1 logs | Screenshot the network-log entries and compare them with the dropout times. | Coax/RFoG signal noise, upstream ranging or external line fault |
| Virgin Stream Box loops on loading or verification | Use the Stream Box recovery steps before judging raw broadband speed. | Device cache, account handshake or loaded latency |
| Gig1 download is strong but upload breaks calls or streams | Check whether the home is on HFC or Nexfibre and whether symmetrical upload is available. | Access-network upload profile or bufferbloat |
Virgin Media broadband issues and checks
Use this anchor for Virgin Media users who need practical help with Hub status, latency, packet loss, evening slowdown or modem-mode routing.
Check wider Virgin Media service issues first
Before changing Hub, modem-mode or Wi‑Fi settings, check Virgin Media’s official service-status checker for broadband, TV, landline or area faults.
Open Virgin Media official service status ↗- Virgin Media Hub status: Check 192.168.0.1 in router mode or 192.168.100.1 in modem mode before rebooting.
- Hub light problems: Use the Hub 3, 4, 5 and 5x light key to separate firmware update, overheating, WPS and physical-link states.
- T3/T4 dropouts: Screenshot repeated network-log timeouts so support can see the fault is not just Wi‑Fi range.
- Hub 3 or Puma latency: Use wired loaded-latency and bufferbloat evidence when older hardware shows jitter or upload-related lag.
- Stream Box loops: Restart or recover the Stream Box before treating a verification loop as slow broadband.
- Evening slowdown: Compare wired daytime and evening results to separate local segment congestion from Wi‑Fi coverage.
- Modem-mode problems: Check double NAT, mesh backhaul and third-party router settings before blaming the Virgin access line.
When Virgin Media troubleshooting is no longer enough
If the wired Hub result is healthy but Wi‑Fi rooms underperform, fix mesh placement or use modem mode with stronger routing hardware. If a Hub 3 repeatedly shows loaded-latency spikes, collect loaded latency and bufferbloat evidence before requesting a hardware review. If the Hub logs repeated T3/T4 errors, peak-time wired results collapse, or upload activity breaks calls and live streams, compare HFC versus Nexfibre availability while preserving test evidence.