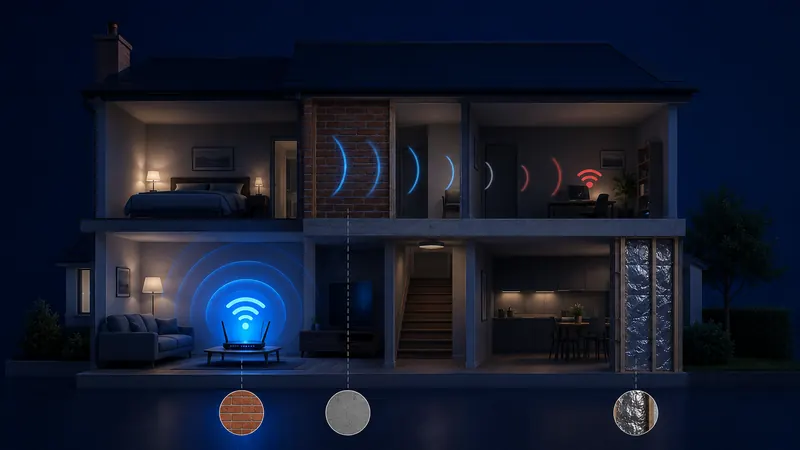
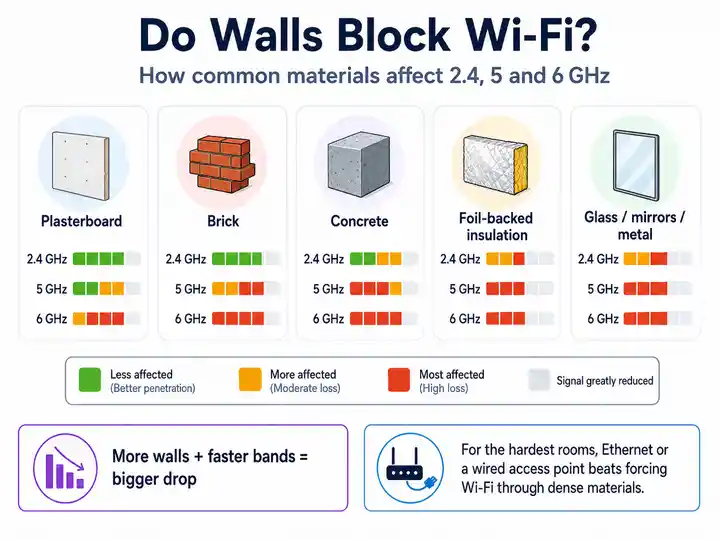
Use this as a practical attenuation guide, not a lab guarantee. Router position, wall thickness, moisture, metalwork and device radios can all change the real-world result.
1. Plain plasterboard stud partition walls
Signal degradation profile: low to moderate attenuation.
The technical culprit: lightweight wooden or metal studs holding dry plaster sheets offer limited radio resistance, although multi-layered boards can still clip high-frequency 6GHz signals.
Strategic fix: optimise central router airspace with the best router position guide before purchasing extra hardware.
2. Dot and dab plasterboard with hidden blockwork
Signal degradation profile: moderate to severe attenuation.
The technical culprit: plasterboard fixed to dense blockwork with adhesive dabs can create air gaps, scattering and a hidden masonry barrier behind what looks like a light wall.
Strategic fix: treat the wall like solid masonry and position mesh Wi‑Fi nodes or access points around the obstacle rather than behind it.
Do Solid Brick Walls Block Wi‑Fi in UK Homes?
Signal degradation profile: moderate attenuation on 2.4GHz and heavy attenuation on 5GHz or 6GHz.
The technical culprit: dense mineral material absorbs and scatters radio waves, especially when the signal must cross several rooms or a chimney breast.
Strategic fix: move the router to a more open route with the router positioning guide, use mesh before the wall bottleneck, or run Ethernet to the far side.
4. Thick concrete, stone and floor slabs
Signal degradation profile: severe attenuation, especially between floors or flats.
The technical culprit: concrete density, moisture content and embedded metal reinforcement can absorb or reflect high-frequency Wi‑Fi.
Strategic fix: use wired backhaul or Ethernet, a wired access point, Powerline where suitable, or mesh nodes with a clean backhaul path.
Does Celotex, Kingspan or Recticel Foil Insulation Block Wi‑Fi?
Signal degradation profile: critical attenuation when the foil layer sits directly in the signal path.
The technical culprit: metallic foil surfaces found on popular UK insulation brands like Celotex, Kingspan and Recticel reflect and scatter radio waves. This mirror effect can turn modern extensions, loft conversions and underfloor-heated zones into wireless dead zones.
Strategic fix: place Wi‑Fi equipment on the same side of the foil layer or bypass the barrier with Ethernet, Powerline or a wired access point.
6. Metalwork, mirrors, appliances and services
Signal degradation profile: unpredictable reflections and local dead spots.
The technical culprit: radiators, large mirrors, fridge freezers, steel beams and pipework can reflect, absorb or redirect the radio path.
Strategic fix: keep the router and mesh nodes away from reflective surfaces and test from multiple positions before buying new kit.
Do Radiators or Underfloor Heating Block Wi‑Fi?
Signal degradation profile: variable, but potentially significant when metal, water, pipework and foil-backed floor layers sit directly in the signal path.
The technical culprit: steel radiators and pipework can reflect or redirect radio energy, while water-filled cylinders and heating loops add dielectric loss. Underfloor systems can become a harder barrier when pipes are combined with dense screed, metal layers or foil-backed insulation.
Strategic fix: keep the router clear of large radiators and hot-water cylinders, then compare the direct floor path with an open stairwell or hallway route. If the vertical path remains weak, use Ethernet backhaul or a wired access point upstairs rather than trying to force wireless through the floor structure.
Why Is Wi‑Fi Weak Through a Bathroom or Tiled Kitchen Wall?
Signal degradation profile: highly dependent on the wall build-up, with dense tile, masonry, mirrors and plumbing often combining into a stronger barrier than the visible surface suggests.
The technical culprit: ceramic, porcelain or stone tiles can add loss, while cement backer boards, dense masonry, metallic mirror backing and pipework can reflect or absorb part of the signal. The effect is usually worse on 5GHz and 6GHz than on 2.4GHz.
Strategic fix: compare the direct bathroom or kitchen wall path with an open doorway or hallway route. If the doorway performs much better, reposition the router or place a mesh node or wired access point so the signal routes around the dense wall rather than through it.
Real-world material attenuation guide
Understanding the 3 dB rule: Wi‑Fi signal power is measured on a logarithmic scale. A 3 dB reduction means roughly half the received signal power, but it does not mean Wi‑Fi speed is automatically halved; throughput also depends on modulation, interference, channel width, device capability and the quality of the remaining signal.
These approximate dB ranges help explain why one wall can feel harmless while another creates a dead zone. Larger negative losses mean less signal reaches the device.
Swipe horizontally to view all table columns →
| UK material profile | Average loss at 2.4GHz | Average loss at 5GHz / 6GHz | Severity |
|---|
| Standard glass window | -2 dB | -4 dB | Low |
|---|
| Plasterboard partition | -3 dB | -5 dB | Low |
|---|
| Solid red clay brick, around 100mm | -6 dB | -12 dB | Moderate |
|---|
| Thick concrete or stone wall | -12 dB | -25 dB+ | Severe |
|---|
| Foil-faced PIR board, including Celotex, Kingspan or Recticel | -15 dB+ | -30 dB+ or complete drop | Critical |
|---|
The rebar and mesh-lath Faraday cage trap
A reinforced wall or floor can behave like a partial Faraday cage when steel mesh, rebar or metal lath sits inside the structure. Instead of passing cleanly through, high-frequency Wi‑Fi is reflected, absorbed or redirected.
If 5GHz or 6GHz collapses behind one reinforced wall but 2.4GHz remains barely usable, treat the building layout as the bottleneck: move the hub, route around the barrier, or use a wired access point on the far side.